Running a business is a complex endeavor that involves juggling multiple tasks, appointments, and responsibilities, all while striving to provide a seamless and enjoyable experience for clients. This multifaceted nature of entrepreneurship demands not only time management but also strategic planning and effective communication. One tool that can significantly ease this burden is Go High Level’s calendar customization feature, which offers a wide range of options to enhance scheduling efficiency. This essential tool is particularly valuable for small business owners, marketing agencies, and entrepreneurs who need to streamline their scheduling processes and ensure no appointment is missed.
In this comprehensive guide, we will delve into the various ways you can tailor your calendar to better suit your unique needs and preferences. You will learn how to create custom forms that effortlessly capture important client information, such as contact details, preferences, and specific requests, making the onboarding process smoother. Additionally, we will explore how to utilize rich text descriptions to provide clear and comprehensive details about appointments, ensuring your clients know exactly what to expect. Furthermore, we’ll discuss implementing color schemes that reflect your brand identity, helping to create a visually appealing and cohesive experience for both you and your clients.
These customization options not only enhance your organizational efficiency but also contribute to a more professional image. By presenting a well-structured and branded calendar, you can impress clients and improve overall satisfaction. The ability to convey professionalism and attention to detail can lead to stronger client relationships and increased trust, which are essential for long-term success. Whether you are managing a busy schedule or looking to optimize your time management, these strategies will empower you to take control of your calendar and elevate your business operations.
Go High Level Calendar Customization
Go High Level Calendar Customization is a powerful feature within the Go High Level platform, meticulously designed to provide entrepreneurs and businesses with a personalized and efficient scheduling solution tailored to their unique needs. This innovative tool allows users to customize their calendars extensively, enabling them to adjust settings such as time blocks, appointment types, and availability according to their specific operational requirements. By streamlining the process of managing appointments and tasks, users can significantly reduce scheduling conflicts and enhance their overall productivity.
Integrating custom forms is another remarkable aspect of this feature, as it enables the collection of critical client information even before appointments are scheduled. This preemptive approach not only saves time but also facilitates seamless interaction between businesses and clients from the very beginning, ensuring that all necessary details are readily available for a more productive meeting.
Moreover, the feature’s flexibility extends to visual customization, allowing users to apply brand-representative color schemes, logos, and rich text descriptions that align with their branding strategy. This level of personalization helps businesses project a cohesive and professional image, reinforcing their identity and strengthening their connection with clients.
Through these comprehensive capabilities, businesses can not only optimize their scheduling processes, making them more efficient and user-friendly, but they can also enhance both operational flow and client satisfaction. By leveraging Go High Level Calendar Customization, companies can create a more engaging and organized experience for their clients, ultimately leading to stronger relationships and improved business outcomes.
Setting Up Custom Forms in GHL Calendar
Custom forms are a powerful feature that can significantly enhance customer engagement and streamline various processes within your organization. By incorporating custom forms into your calendar, you can efficiently collect essential information directly from clients during the booking process, ensuring that you have all the necessary details at your fingertips. This feature proves to be particularly useful for event registrations, consultations, or client onboarding, as it allows for a more tailored experience right from the start.
With custom forms, you can ask specific questions that are relevant to the services you offer, enabling clients to provide information that helps you prepare better for their needs. For example, you might include fields for dietary restrictions for an event or specific topics they’d like to discuss during a consultation. Having this information upfront reduces the need for back-and-forth communication, thereby saving valuable time and improving overall client satisfaction.
Additionally, well-designed custom forms can leave a positive impression on your clients, as they demonstrate your professionalism and commitment to providing a personalized experience. By adopting this feature, you not only enhance your operational efficiency but also build stronger relationships with your clients, ultimately leading to greater loyalty and repeat business.
Step-by-Step Guide to Adding Custom Forms
Adding Custom Form Fields
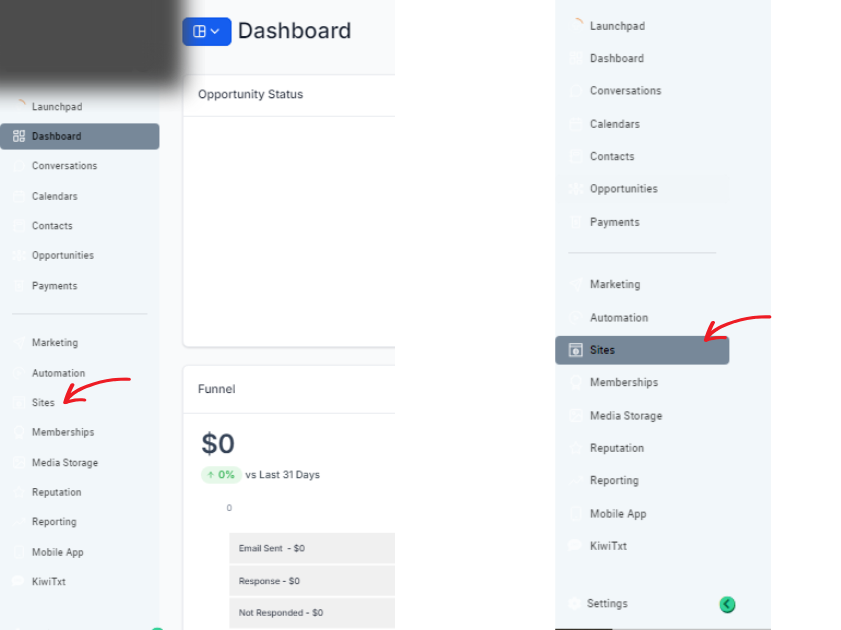
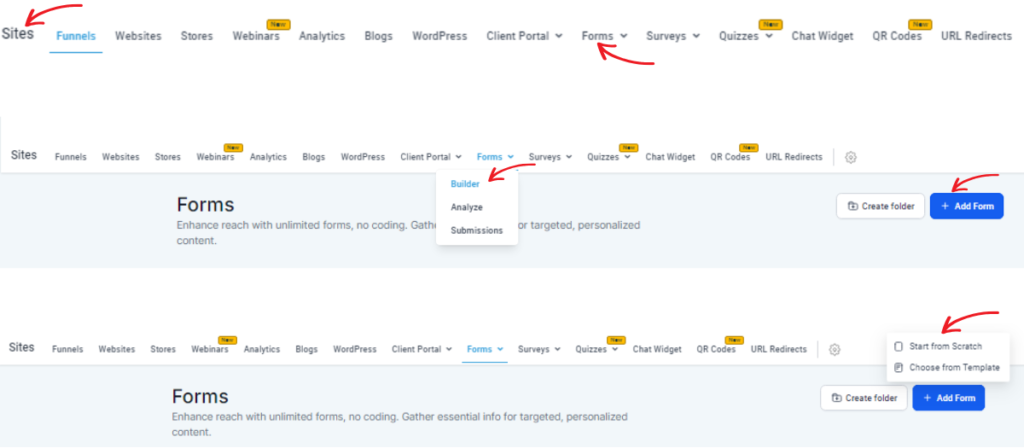
To begin, navigate to the main dashboard of your GHL account. Once there, look for the sites option located on the left side of the screen and click on it. This will bring you to the section where you can manage your websites. Within the sites option, open the form builder tool, which is designed to help you create customized forms for various purposes.
To create a custom form, start by selecting the “Add Form Field” button prominently displayed in the interface. This will allow you to begin adding different fields to your form. You can include various types of fields such as name, email, and appointment reason, ensuring that you capture all necessary information from your users.

As you customize your form, you have the flexibility to choose from different field types, including text boxes for open-ended responses, dropdown menus for selections, or checkboxes for multiple-choice options. This variety not only enhances user experience but also ensures you gather the specific information you need effectively. Tailoring each form to meet the exact requirements of your services or events is crucial, as it allows for better data collection and improves overall user engagement. This attention to detail can significantly enhance the effectiveness of your forms and contribute to the success of your initiatives.
Navigating to Calendar Settings
Accessing the calendar settings in Go High Level is the crucial first step to effectively customizing your forms for better usability and functionality. Once you’re on the main dashboard, look for the main menu typically located on the left side of the screen.
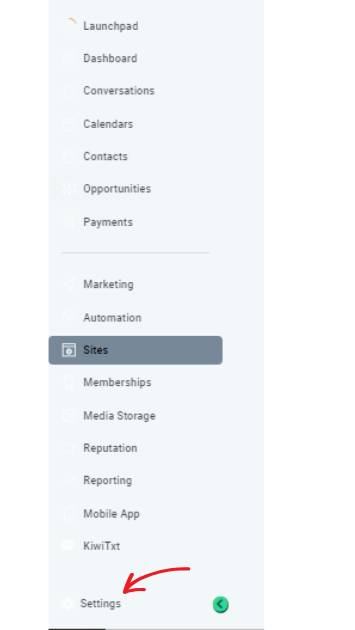
From there, select the “Calendar” option, which will direct you to the calendar interface. Here, you’ll find the settings icon, often represented by a gear symbol; clicking on this will open up a range of customization options. These options allow you to tailor your forms to better suit your specific needs and improve user experience. Take your time to explore the various settings available to maximize the potential of your forms.

Creating or Selecting a Calendar
Once you access the settings, you’ll have the option to either create a new calendar or modify an existing one to better suit your specific needs and preferences. This flexibility is particularly beneficial for individuals and businesses alike. For businesses that offer multiple services or host various events, the ability to create separate calendars can significantly enhance your capability to manage schedules effectively and avoid conflicts that can arise from overlapping appointments. This way, each calendar can be meticulously tailored to address specific events or services, allowing you to organize your activities more efficiently and keep track of important dates with greater ease.
Additionally, after selecting a calendar that aligns with your requirements, you can begin adding custom forms that are specifically designed for your events. These forms ensure that all necessary information is captured accurately, which is essential for effective communication and planning. With this level of customization, your scheduling process can run smoothly, minimizing the potential for errors and ensuring that all participants are well-informed and prepared for upcoming engagements. Overall, this system empowers you to take full control of your scheduling needs, making the management of your time more productive and organized.
Embedding Custom Forms in Calendar Pages
Once your form is set up and ready to go, embedding it into your calendar pages is a straightforward process that can significantly enhance your scheduling efficiency. Start by navigating to the specific calendar page or appointment type where you’d like the form to be displayed. This could be a personal calendar, a team calendar, or any scheduling interface you’re using, such as Google Calendar or Outlook. Each platform may have its unique features, so being familiar with the settings is beneficial.
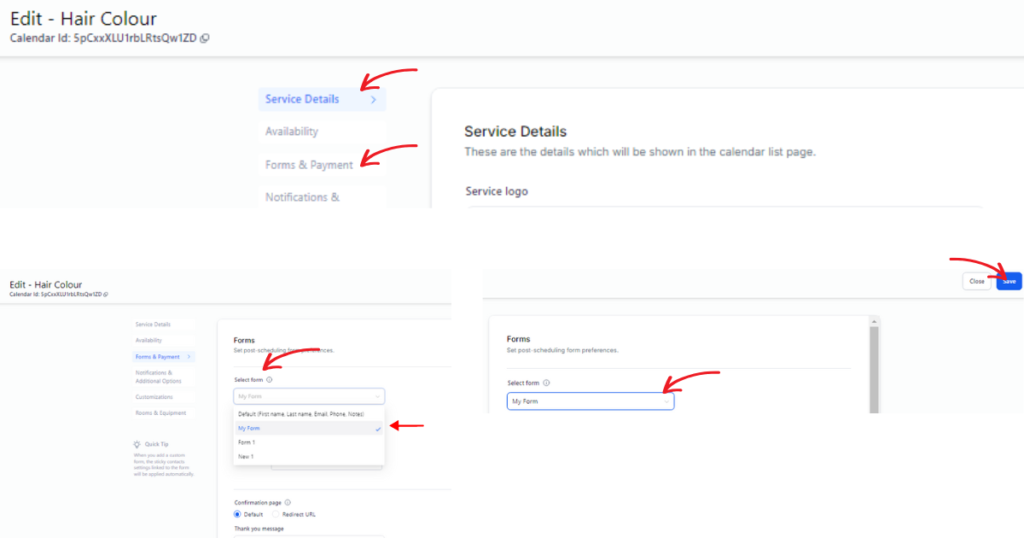
Once you’ve located the desired calendar, proceed to edit it by accessing the editing options. Look for an “Edit” button or a pencil icon, which typically signifies that you can modify the current settings or layout. From the menu of available features, select the form option to integrate your form seamlessly. This option may be labeled differently depending on the software but generally includes terms like “Select Form,” “Embed Form,” or “Link Form.”
In the subsequent options provided, make sure to choose the correct form that you wish to embed, ensuring it aligns with the purpose of your appointments or events. For instance, if you’re scheduling a meeting, select a form that captures attendee availability or preferences. This simple integration will facilitate easier access for users and streamline the information-gathering process, allowing you to collect necessary data without sending separate emails or messages. By incorporating the form directly into the calendar, you not only enhance the user experience but also promote efficiency among team members, making scheduling and event planning a much smoother operation.
Saving and Publishing Your Custom Forms
After embedding your custom forms, saving and publishing them is crucial to ensure that your updates and modifications are not lost. To do this, simply use the “Save” button, which guarantees that all changes are securely stored in the system. Once you’ve saved your progress, it’s a good idea to preview the form; this allows you to check not only its visual appearance but also its functionality, ensuring that everything works as intended. When you are completely satisfied with how the form looks and operates, you can proceed to publish it, making it live and accessible on your calendar for users.
Furthermore, it’s wise to test the form with a mock appointment to simulate the user experience. This proactive step can help identify any potential issues or glitches that may arise before clients start interacting with it. Taking the time to thoroughly review and test your forms can greatly enhance the user experience and ensure a smooth process for everyone involved.
Using Rich Text to Enhance Calendar Descriptions
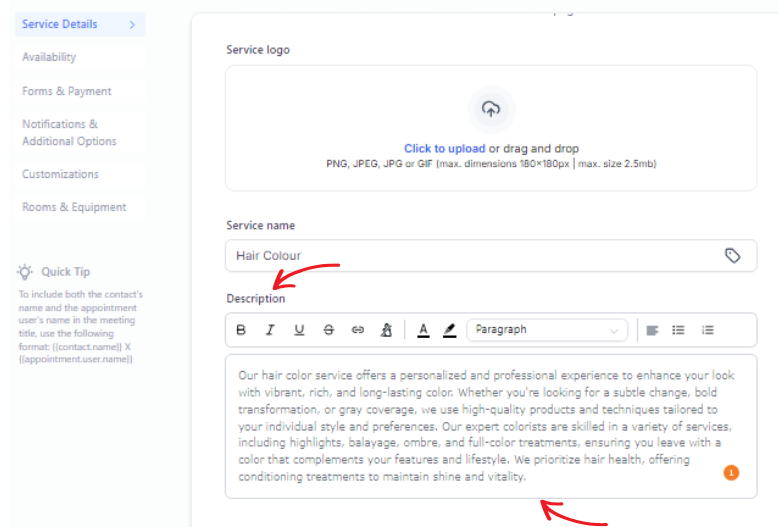
With the rich text editor, you can now enhance your calendar descriptions with various formatting options. Here are the features you can use:
Text Formatting
- Bold: Emphasize important information by making it bold.
- Italics: Highlight key terms or phrases using italics.
- Underline: Draw attention to certain words by underlining them.
- ~~Strikethrough~~: Indicate deletions or outdated information using strikethrough.
Lists
- Create organized content with bulleted lists.
- Present information sequentially with numbered lists.

Hyperlinks
- Add clickable links to redirect users to other pages from the booking widget, facilitating easy access to additional resources or websites.
Text & Background Color
- Customize text and background colors to match your theme, ensuring your calendar is visually aligned with your brand identity.
Paragraphs and Headings
- Organize content with well-defined paragraphs and different headings, allowing for a structured and easy-to-follow layout.
Text Alignment
- Align text to the left, center, or right as per your preference, giving you control over the visual presentation of your content.
Benefits of Rich Text in Calendar Descriptions
Incorporating rich text into your calendar descriptions can significantly enhance usability and communication for both personal and professional purposes. By utilizing rich text formatting, you can create detailed and visually appealing descriptions that improve clarity and engagement for the reader. This approach allows you to emphasize important information and make your entries stand out.
For example, adding hyperlinks to relevant resources can provide quick access to additional information, while highlighting key points with bold or italic formatting can draw attention to essential details. Furthermore, using bullet points or numbered lists can help organize information clearly, making it easier for users to digest the content at a glance. Overall, these enhancements can transform your calendar entries into informative and user-friendly tools that facilitate better planning and collaboration.
How to Add and Customize Rich Text in Calendar Descriptions
Accessing Calendar Description Editor
To customize calendar descriptions with rich text for your events, start by accessing the description editor. This can easily be done by selecting the specific calendar event you wish to edit from your calendar view. Once you have clicked on the event, look for the “Edit Description” button, which will allow you to enter the rich text editor. In this editor, you can enhance your descriptions by adding formatting options such as bold, italics, bullet points, and hyperlinks, making your event details clearer and more engaging for attendees.
Rich Text Formatting Options
The rich text editor offers a wide array of formatting options designed to enhance your descriptions and make them more engaging. You can utilize bold and italics to highlight key points, making your text visually appealing and easier to navigate.
Additionally, incorporating bullet points can help organize information clearly, allowing readers to grasp essential details at a glance. Hyperlinks can also be seamlessly added, providing direct access for clients to external resources or related content that enriches their understanding. By leveraging these features, your calendar entries can transform into interactive and informative tools that not only convey information but also invite further exploration and engagement from your audience.
Embedding Links and Media
Embedding links and media within your calendar descriptions can significantly enhance the experience for your clients by providing additional context, resources, and interactive elements. By including videos, images, or documents, you can enrich the content and make it more engaging and informative.
For example, attaching a promotional video for an upcoming event can generate excitement, while including relevant articles or documents can help participants prepare adequately. This feature is particularly useful for events such as webinars or workshops, where attendees may benefit from supplementary materials like slides, handouts, or reference links. By offering these resources, you create a more comprehensive experience that not only informs but also engages your clients.
Tips for Writing Effective Descriptions
When crafting calendar descriptions, clarity, and engagement are crucial for effective communication. It’s important to use concise and straightforward language that gets straight to the point while still being engaging. Organizing the content logically helps the reader follow along easily, so consider using bullet points or numbered lists for key information.
Highlighting essential details at the beginning ensures that the most important items grab the reader’s attention right away. Additionally, while rich text features like bold or italics can enhance readability, they should be used sparingly to avoid cluttering the description. Remember, engaging descriptions not only improve understanding but also encourage client interaction, making them feel more connected to the content and more likely to participate.
Previewing and Testing Calendar Descriptions
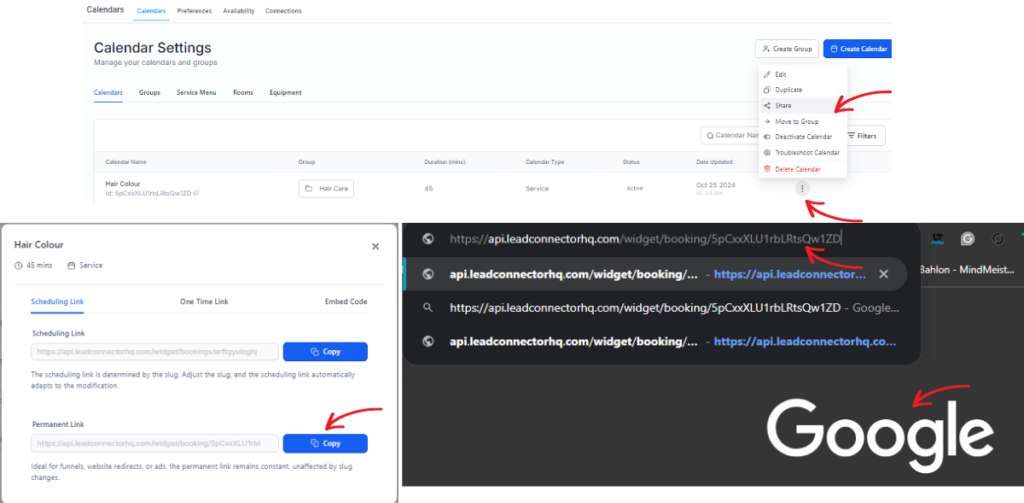
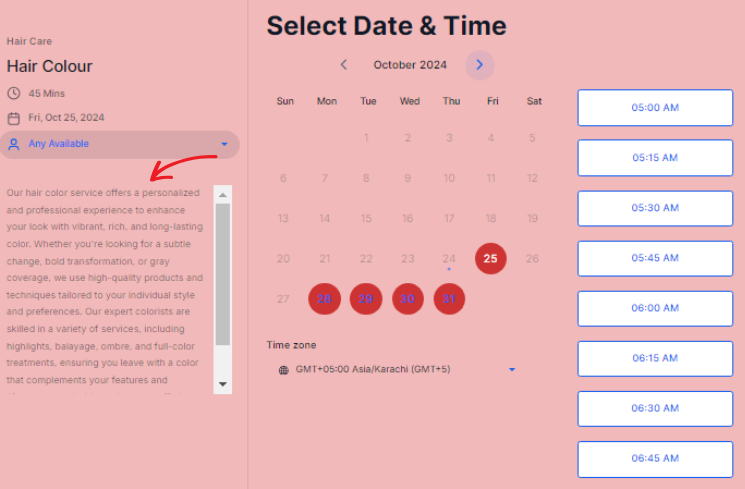
Before finalizing your calendar descriptions, take a moment to preview them to ensure they display correctly across a variety of devices. It’s essential to test the descriptions on both desktop and mobile platforms to verify consistency in appearance and readability. By doing so, you can identify any formatting issues or discrepancies that may arise on different screens. This thorough testing process ensures that all users, whether accessing your calendar from a computer, tablet, or smartphone, have a seamless and enjoyable experience. A well-presented description not only improves user engagement but also enhances the overall effectiveness of your calendar.
Customizing Calendar Colors
Color customization plays a crucial role in branding and enhancing user experience, particularly in digital tools and applications. By allowing businesses to customize calendar colors, they can effectively align their scheduling tools with their unique brand identity, reinforcing recognition and loyalty among users. For instance, using specific colors that reflect a company’s branding can create a cohesive visual experience that resonates with clients and employees alike.
Additionally, color-coding different events, tasks, or teams not only aids in visual differentiation but also simplifies navigation within the calendar. This method enhances usability, as users can quickly identify important deadlines, meetings, or team activities at a glance, thereby improving overall productivity. Ultimately, thoughtful color customization fosters a more engaging and user-friendly environment, where branding and functionality go hand in hand.
Step-by-Step Guide to Customizing Calendar Colors
Accessing Color Settings in the Calendar
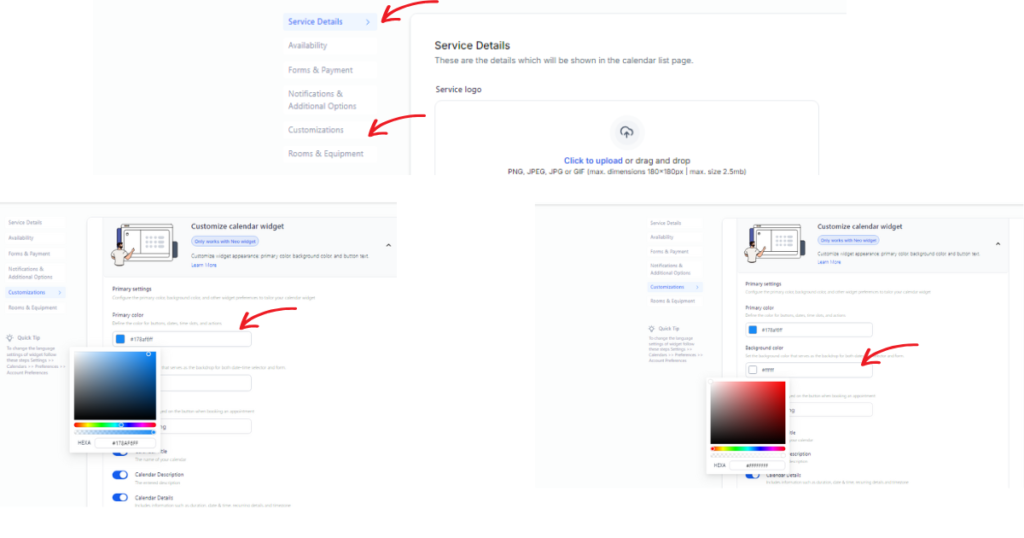
To start, access the color settings within the Go High Level calendar tool by logging into your account. Once you’re in, navigate to the calendar you’ve selected for customization. Look for the “Color Settings” option, usually found in the settings menu or toolbar. In this section, you’ll discover a range of customization options, allowing you to modify everything from the background colors to the text and event highlights. Take your time to explore these features to create a calendar appearance that suits your style and enhances your productivity.
Choosing Calendar Colors Based on Events or Teams
Assigning different colors to events or teams can significantly enhance organization and readability, making it easier for individuals to manage their schedules and responsibilities. When selecting colors, it’s important to choose shades that distinctly represent each category, ensuring that they are easily recognizable at a glance.
For example, using blue for meetings, green for deadlines, and red for urgent tasks can create a clear visual hierarchy. This differentiation not only helps users quickly identify appointments but also allows them to allocate resources and prioritize their time effectively, leading to improved productivity and reduced stress. By implementing a color-coding system, individuals can streamline their workflows and maintain better oversight of their commitments.
Using Hex Codes for Exact Color Matching
For precise color matching, Go High Level allows the use of hex codes, which are six-digit alphanumeric codes that represent specific colors. By entering your brand’s specific hex codes, you can ensure that the colors of your calendar seamlessly align with your brand guidelines, creating a cohesive visual identity. This level of detail is crucial for maintaining consistency in your brand presentation, as it reinforces brand identity across all touchpoints. Whether it’s in marketing materials, social media posts, or client communications, having a unified color scheme enhances recognition and trust with your audience, making your brand more memorable.
Tips for Effective Calendar Color Customization
When customizing calendar colors, it’s essential to consider both readability and functionality to ensure users can easily navigate and interact with the calendar. Choose colors that not only provide sufficient contrast but also enhance the overall visual appeal of the calendar. For instance, softer hues can create a calming effect, while vibrant colors can highlight important events.
However, it’s crucial to avoid overly bright or harsh colors, as they may strain the eyes and lead to fatigue. Effective color customization plays a significant role in enhancing user experience and engagement, as it can help users prioritize their schedules and make the calendar more enjoyable to use. A well-thought-out color scheme can transform a simple calendar into a powerful organizational tool.
Previewing and Adjusting Calendar Colors
Once your colors are set, take a moment to preview the calendar to see how they appear across different views, including monthly, weekly, and daily layouts. This step is crucial, as each view can present colors differently based on the layout and the amount of information displayed. Make adjustments if necessary to ensure that the colors are not only visually appealing but also clear and cohesive.
A well-designed color scheme can significantly enhance user satisfaction by making it easier to navigate and comprehend the information at a glance. Furthermore, a thoughtful color palette can contribute to improved efficiency, allowing users to quickly identify important events and tasks without confusion.
Testing and Finalizing Your Customized Calendar
Testing your calendar customizations is essential to ensure both functionality and usability. This process involves not just checking if the features work as intended, but also evaluating the overall user experience. By identifying and resolving issues early, you can avoid potential disruptions that could impact productivity and client satisfaction. This proactive approach not only minimizes setbacks but also helps establish a more reliable and seamless experience for your clients. Furthermore, thorough testing allows you to fine-tune features, adjusting them to better meet your specific business needs and ensuring that they align with your operational goals. Taking the time to test thoroughly can lead to significant improvements in performance and user engagement.
Troubleshooting Common Issues
Custom Forms Not Displaying Correctly
If custom forms are not displaying correctly, the first step is to check the form settings thoroughly and ensure that all fields are configured properly according to your requirements. Make sure each field has the appropriate labels and validation rules in place. Additionally, verify that the form is embedded in the correct calendar pages; this means checking that the URLs or identifiers match the intended location. It’s also important to look for any potential conflicts with other elements on the page, such as overlapping scripts or styles that may interfere with the form’s functionality. Conducting these checks will help ensure that your custom forms function as intended.
Rich Text Formatting Problems
For any issues related to rich text formatting, it is essential to thoroughly review the settings of the description editor. Start by ensuring that all available formatting options, such as font styles, sizes, and color choices, are applied correctly to achieve the desired appearance. Additionally, take the time to check for any unsupported elements—like specific HTML tags or styles—that may be causing inconsistencies in the text display. This careful attention to detail can help maintain a polished and professional look in your content. If problems persist, consider consulting the editor’s documentation or support resources for further guidance.
Calendar Colors Not Updating
If calendar colors are not updating as expected, there are a few steps you can take to troubleshoot the issue. First, try clearing the cache of your browser or application, as outdated cached data can sometimes prevent updates from displaying correctly. After clearing the cache, refresh the page to see if the colors update.
Additionally, it’s important to double-check the color settings in your calendar application. Make sure that the hex codes for the colors are entered accurately, as even a small mistake can lead to incorrect color displays. By resolving these issues, you can ensure that your calendar not only functions properly but also appears visually appealing and organized as intended.
Finalizing and Launching Your Calendar
Before launching your customized calendar, take the time to conduct a thorough final review to ensure that all elements are functioning as desired. This step is crucial, as it allows you to catch any last-minute issues that could affect usability. Use a detailed checklist to meticulously verify that all forms are working properly, descriptions are clear and accurate, and colors are correctly integrated to maintain a cohesive aesthetic.
Pay attention to how the calendar looks on various devices to ensure compatibility. Once you are completely satisfied with the final product and confident that everything is in order, proceed to publish the calendar. After publishing, take the initiative to share it with clients or teams, along with any instructions or tips for optimal use, to maximize its effectiveness and utility.
FAQs
How do I customize the colors in my GHL calendar?
To customize colors in your GHL calendar, start by accessing the calendar settings and navigating to the color customization tab. Here, you can select different colors for various elements, such as events and categories, using either a color picker or by entering hex codes directly. Remember to preview your changes in different calendar views to ensure they are visually harmonious and functional.
What should I do if a custom form isn’t displaying properly?
When a custom form fails to display correctly, check that all fields are correctly configured and that validations are appropriately set. Make sure the form is embedded on the correct calendar pages by verifying the URLs or identifiers. Additionally, resolve any potential conflicts with page scripts or styles by reviewing and adjusting them as necessary.
How often should I test my calendar customizations?
Regular testing of your calendar customizations is recommended, especially after making significant changes. Conduct tests whenever you add new features or adjust existing ones to ensure every component works seamlessly. This proactive approach helps maintain functionality and improves the overall user experience.
Conclusion
Customizing your GHL calendar with features like personalized forms and tailored color schemes can significantly enhance both its utility and aesthetic appeal. By carefully selecting colors that reflect your brand identity and testing the functionality of each form, you can create a tool that is not only visually pleasing to use but also highly efficient and aligned with your organizational goals. This process involves considering how different colors can influence mood and productivity, ensuring your calendar fosters a positive work environment.
Additionally, be sure to troubleshoot any issues that arise during this customization process, as addressing potential glitches early on can save time and frustration later. Fine-tuning your settings is crucial for achieving optimal results; this may involve adjusting reminders, integrating other tools, or even seeking feedback from team members on what features would best serve their needs.
With regular maintenance and timely updates, your customized calendar will not only adapt to the evolving needs of your team but also serve as a powerful asset in streamlining workflows and significantly improving overall productivity. By investing time into this customization, you’ll create a calendar that truly supports your team’s efficiency and effectiveness in reaching their objectives. For further detail and help Contact Us!
